ART 103 Drawing and Composition 1 – 23903
Week Fifteen – 4/14/14
- Critique on Portraiture.
- Introduction to Figure Drawing and Gesture Drawing.
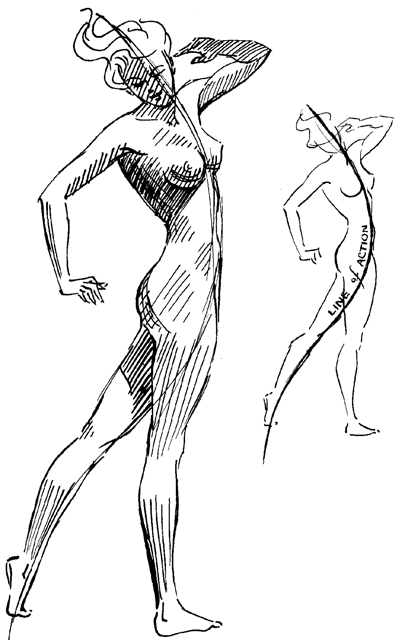
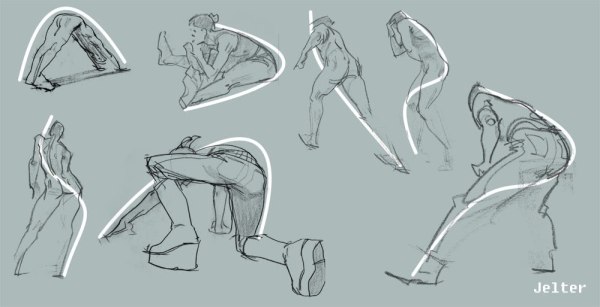
- Introduction to Line of Action (Line of Force).
Line of Action – Main gestural line through the body from head to toe.
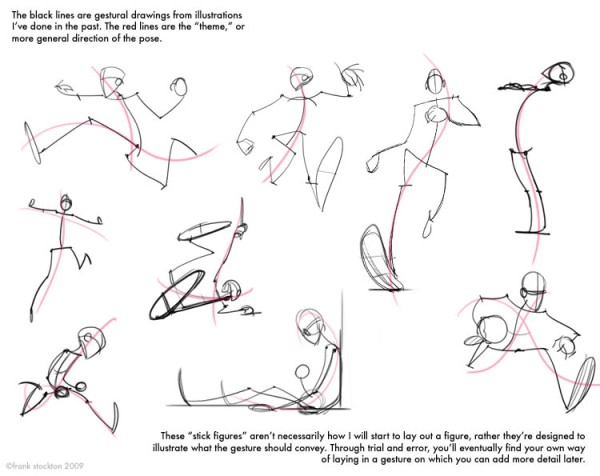
Basic Stick-Figure Drawings with Line of Action.
Gesture Drawings – Quick reference drawings that capture the immediate gesture or posture of the subject with minimal detail. Gesture drawings are to Figure Drawing as to what Thumbnail Drawings are to Still-Life Drawing.
Line of Action Examples (Download PDF)
Gesture Drawing Examples (Download PDF)
In-Class: Do the following sequences of Gesture Drawings all on the same 18″ x 24″ sheet(s) of paper in whatever media of your choice:
- Three 5-minute poses
- Three 3-minute poses
- Five 1-minute poses
- Ten 30-second poses
On a blank side or new sheet of 18″ x 24″ paper, do one 20-min. pose and on the other side of the page do one 10-min. pose, each covering the page with as much detail and value as you can do.
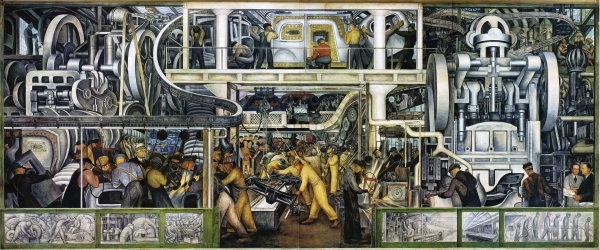
Homework Assignment: Final Group Mural Project – Due 4/28/14 – the last day of class.
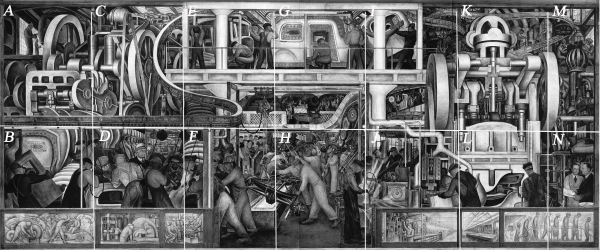
“Detroit Industry Murals – South Wall” by Diego Rivera
http://en.wikipedia.org/wiki/Detroit_Industry_Murals
Each student is given a specific section of the mural to recreate, with either the dimensions of 18″ x 24″ or 9″ x 24″ depending on the section’s location in the mural. On the back of each handout is the letter of the section, it’s orientation (the arrow points to the top of the section), and the dimensions. Recreate to the best of your ability, using any media: pencil, marker, pen, brush & ink, charcoal, paint, etc. It can be a mixed media or collage. You are given full creative liberty on technique, so long as your recreate the image to the best of your ability.
If you were absent, contact the instructor to get your section for the mural.
ART 103 Drawing and Composition 1 – 23903
Week Fourteen – 4/7/14
- Critique on Color Charts and Color Drawings.
- Introduction to Portraiture.
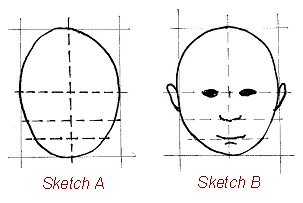
In-Class: This is a basic introduction on how to draw the face using a formula for generalized mannequin features and proportion. Every person’s face is a little different, so once the basic proportions are mapped out on the page, then you refine and change details to match your subject.
- First, draw an oval or egg shape, with the wider part on top of the page for the top of the head, and the more smaller end toward the bottom for the chin.
- Next, draw a vertical line down the center to bisect the head shape evenly in half.
- Then draw a horizontal line across the middle to bisect the head shape evenly in half again. This horizontal line becomes your Eye Line.
- Next, draw another horizontal line between the Eye Line and the chin to evenly bisect that half of the head shape. This becomes your Nose Line.
- Finally, draw another horizontal line between the Nose Line and the chin to evenly bisect that specific length of the head shape. This becomes your Mouth Line.
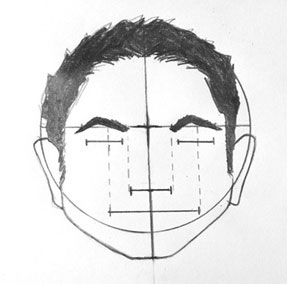
The width of the face is basically the width of 5 eyes across. Measure and divide the Eye Line into 5 sections as evenly as you can. From the left side of the face to the right, the Eye Line should have an empty space the length of the eye, the left eye, the middle empty space between the eyes that’s the length of one eye, the right eye, and then the last empty space the length of one eye to the right side of the face.
- To determine the width of the nose, draw a vertical line from the inside edge of each eyedown to the Nose Line.
- To determine the width of the mouth, draw a vertical line from the middle of each eye down to the Mouth Line.
- To determine the length of the ears, the top of the ear should be in line with the top of the eyes, and the bottom of the ear should be in line with the Nose Line. (Some ear lobes stretch down between the nose and mouth)
- To determine the Eyebrow Line, measure the height of one eye, and then add that on top of theEye Line and draw one more horizontal line across the top of this new measurement. Another way to find it is just to measure half of one eye and add that directly above the eye.
The Hair Line of the Scalp should start right around the middle of the forehead, evenly between the Eye Line and the top of the head. The hair on both men and women reaches down to the top quarter of the ear to begin the sideburns.
Never draw the entire circle of the iris of the eye, unless you want the person to look surprised. Usually have the top of the iris overlapped by the top of the eye shape forming the eyelid, and sometimes the bottom overlaps, as well, creating a more relaxed look. Eyes usually pick up some reflection from surrounding lights, so add in little circles of white sparkle, usually in one upper corner of the irises. If the person has light colored eyes, you can add in the dark pupils, and add value or line to the iris. If they have dark eyes, the whole iris could be dark value.
Stay away from solid contour lines on both sides of the nose. Pick one side, and perhaps add value to the other, or use broken contour line. Same thing with avoiding solid contour line all the way around the mouth (unless the subject has very full lips). The bottom lip is usually much bigger and the top lip thinner.
Once you have mapped out the basic mannequin feature, begin refining to make the drawing look more like your subject. Change widths and shapes of eyes, nose, mouth, chin and jaw, etc. Everybody’s face is a little different.
For the In-class assignment, draw an 18″ x 24″ portrait of a person from observation.
Portraiture 1 (Download PDF)
Portraiture 2 (Download PDF)
Homework: Draw an 18″ x 24″ Self-Portrait, either from a mirror or from a photo.
ART 103 Drawing and Composition 1 – 23903
Week Thirteen – 3/31/14
- Critique on Group Mural Project.
- Introduction to Color Theory.
ART 103 Color Theory (Download PowerPoint)
Color Wheel Worksheet (Download PDF)
Complementary Color Chart (Download PDF)
Analagous Color Chart (Download PDF)
In-Class: Complete the following Color Charts using Soft Pastels or Oil Pastels:
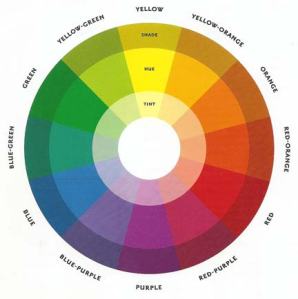
- Color Wheel – The outer ring is for the primary, complementary, and tertiary colors. The middle ring is for shades (you add black to the colors). The inner ring is for tints (you add white to the colors).
- Complementary Color Chart – Fill in the 3 Primary and 3 Secondary colors.
- Analagous Color Chart – Choose any 3 colors and their analagous colors.
Homework: Create a composition on the 18″ x 24″ paper from either direct observation or imagination. The emphasis of the composition should be on color, using a particular color scheme (i.e. primary, secondary, analagous, etc.) or a combination of color schemes.
ART 103 Drawing and Composition 1 – 23903
Week Twelve – 3/24/14
- Critique on Shading and Rendering in Vine Charcoal.
- Introduction to Compressed Charcoal.
In-Class: Do 3 compositional thumbnails from different locations around the still-life and 1 final 18″ x 24″ drawing. Do all of the value in Compressed Charcoal and Vine or Willow Charcoal.
Homework: Group Mural Project
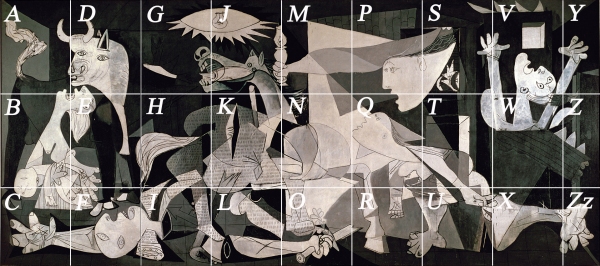
“Guernica” by Pablo Picasso
http://en.wikipedia.org/wiki/Guernica_(painting)
Each student is given a specific section of the mural to recreate, with either the dimensions of 18″ x 24″ or 18″ x 24″ depending on the section’s location in the mural. On the back of each handout is the letter of the section, it’s orientation (the arrow points to the top of the section), and the dimensions. Recreate to the best of your ability, using any of the media from class: pencil, marker, pen, brush & ink, charcoal, etc. It can be a mixed media or collage. You are given full creative liberty on technique, so long as your recreate the image to the best of your ability.
If you were absent, contact the instructor to get your section for the mural.
ART 103 Drawing and Composition 1 – 23903
Week Eleven – 3/17/14
- Critique on Value and Mark-Making assignments.
- Introduction to Shading and Rendering in Charcoal.
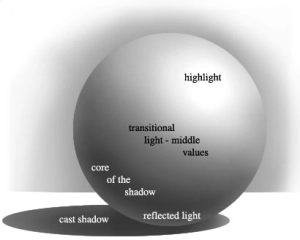
In-Class: Draw a rectangle in your sketchbook, and divide it into 7 equal sections. Using Vine Charcoal, you are to create a Value Chart: The middle section is the Middle Grey, the section on the far right is Black, and the section on the far left is White (blank paper). Fill in all of the gradual value shifts in between.
Vine Charcoal Exercise. Choose 3 objects of varying sizes, shapes, and colors. Draw each object on the 18″ x 24″ page, either individually or as your own still-life. Draw all of the value using only Vine Charcoal.
Note: Any blending of the Vine Charcoal loses all of its darkest black– to keep the darkest black, do not blend that area.
Homework: Three sketchbook thumbnails and one finalized 18″ x 24″ drawing of a your own still-life with 3 to 5 objects on fabric and at least one strong light source, using vine and compressed charcoal for all value.
ART 103 Drawing and Composition 1 – 23903
Week Ten – 3/10/14
- Critique on Perspective Homework.
- Introduction to Mark-Making and Value.
Ink Hatching:
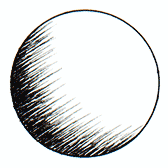
Contour Hatching:
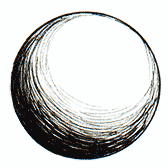
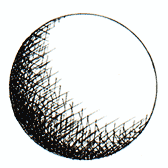
Cross-Hatching:
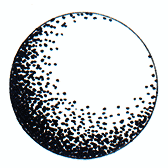
Stippling:
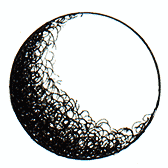
Scumbling (aka Scribbling):
Subtractive Drawing Examples (Click on link)
Still-Life Mark-Making Examples (Download PDF)
Line Sensitivity & Mark-Making (Download PDF)
Lone Wolf & Cub Mark-Making Examples (Download PDF)
In-Class: Divide your 18″ x 24″ paper into 4 sections. Each section will demonstrate a different mark-making technique for all of the value.
Section (1): Cross-Hatching & Contour Hatching & Hatching.
Section (2): Stippling.
Section (3): Combo of Cross-Hatching & Stippling.
Section (4): Subtractive.
Draw 3 or more compositional thumbnails of the still-life. You can use a different composition for each of the four sections, or use the same composition for all the sections, or draw a full composition across the page first, and then divide the composition itself into the four different mark-making sections. Draw in your compositions first in contour line. The cross-hatching and stippling can be done in graphite, pen, marker, conte, or charcoal, and you can vary the tool size to help vary the density of the value. Build up the layers of cross-hatching and stippling, making them denser and closer together for the dark areas, more spread out or lighter marks for the lighter areas. Map out where the highlights are and keep those the white of the paper, and build your layers through the middle gray to the dark. For cross-hatching, rotate the layers to help build density. You need to use compressed charcoal for the subtractive– fill the entire section with a smooth black. With your kneaded eraser, erase back into the drawing, “subtracting” or removing the black back to the white of the paper. Block in your shapes first with the eraser, and then add back in black charcoal for more value and hard edges, and you can use white conte or white charcoal pencil to get the brightest highlights and clean bright edges.
Homework: Draw a composition on the 18″ x 24″ paper either from direct observation or from your imagination, and use a single method or combination of cross-hatching, stippling, and/or subtractive for all of the value.
ART 103 Drawing and Composition 1 – 23903
Week Nine – 3/3/14
*** Spring Break – No Class ***
ART 103 Drawing and Composition 1 – 23903
Week Eight – 2/24/14
- Critique on Line As Abstraction homework and in-class Brush & Ink Paper Bag Still-Life.
- Introduction to Perspective.
ART 103 Perspective 1 (Download PDF)
ART 103 Perspective 2 (Download PDF)
ART 103 2-point interior corner (Download PDF)
Perspective Terminology:
1. Perspective Drawing – The technique used to represent the illusion of a three-dimensional image on a two-dimensional surface (or picture plane).
2. Picture Plane – a. The surface the artist is working on. b. The imaginary plane correspondent with the physical surface of a drawing, painting, or print.
3. Horizon Line – In real life, the horizon is where the land or sea meets the sky. In art, the horizon line is the horizontal line across the picture plane that everything recedes to (the vanishing point), it’s always at eye level, and it’s placement determines where the viewer is looking from, i.e. from above, below, etc.
4. Vanishing Point – The point on the horizon line where the parallel lines of objects appear to meet, i.e. railroad tracks appearing to meet in the distance.
5. View Point – The height from which the viewer sees the subject, which determines where the horizon line is.
6. One-Point Perspective – The perspective lines meet at only one vanishing point on the horizon line, usually when looking directly at the front of an object.
7. Two-Point Perspective – There are two vanishing points on the horizon line, usually when looking at an object from an angle.
8. Three-Point Perspective – There are three vanishing points, with the third usually off of the horizon line.
9. Multiple-Point Perspective – There are several objects at differing angles in the composition with multiple vanishing points both on and off the horizon line.
10. Eye-Level – The viewer is on the same level as the objects in the picture plane.
11. Low-Angle (also called Worm’s-Eye View) – The viewer is below the objects looking up.
12. High-Angle (also called Bird’s-Eye View or Eagle’s-Eye View) – The viewer is above the objects looking down.
13.Visual Perspective – Using perspective to draw objects as they appear to the eye, usually from real life.
14. Linear Perspective (also called Geometric Perspective and Transparent Perspective) – Uses geometric shapes that are transparent to construct the objects in perspective in the composition; linear perspective does not have to be based from real life.
15. Atmospheric Perspective (also called Aerial Perspective) – How atmospheric conditions (the air) influence our perception of objects in the distance, Objects in the distance appear lighter in tone and detail, while objects in the foreground appear strong and crisp.
In-Class: On a single 18″ x 14″ sheet of drawing paper, construct an imaginary box in 1-Point perspective (one vanishing point on the horizon line, where you see only the front side of the box), in bird’s eye view (below the horizon line looking down at the box); an imaginary box in 2-Point perspective (two vanishing points on the horizon line, where you see two sides of the box) in either bird’s eye view orworm’s eye view (above the horizon line looking up at the box); and then one imaginary box in 2-Point perspective right at eye-level (the horizon line is right at your eye-level, going through the center of your box so you don’t see the top or bottom). Next, draw a segmented wall in 1-Point perspective at eye-level (refer to ART 103 Perspective 2 PDF download). Finally, draw a box from observation in 1-Point perspective, and a pair of stacked boxes in 2-Point perspective. Usesighting methods to determine the vanishing points and angles of the boxes. Hold your pencil and/or sighting stick out in front of your eyes to determine your eye level and horizon line for the boxes. If you prefer free-hand drawing, pencil in your boxes first, and then use perspective measurements to double check angles.
Homework Assignment: Three sketchbook thumbnails of either an interior or exterior space utilizing 1-point or 2-point perspective, and one final 18″ x 24″ drawing. You should have extra scratch paper laid out on both sides of your drawing paper to extend your horizon line in both directions– your vanishing points will most likely extend off your drawing page. Use sighting to determine vanishing points and angles.
ART 103 Drawing and Composition 1 – 23903
Week Seven – 2/17/14
- Critique on Contour LIne Still-Life.
- Introduction to Line as Graphic or Abstract Design Element.
- Introduction to Brush and Ink.
In-Class: Paperbag still-life with 2 strong light sources that create high contrast and crossing shadows. Do 3 compositional thumbnails and 1 final 18″ x 24″ drawing of the still-life, filling the entire page and using brush and ink for all of the value. The entire page should have value– the only white paper that should show through should only be for brightest highlights. Squint your eyes to reduce the detail and better show the full range of highlight, middle gray and dark value. Pencil in all of your composition first. Then, using dilution of ink, build up your lightest gray value up to your darkest shadow value. There are 2 basic methods you could use here: 1. Use the ink to fill in your contour line detail first, and then, using ink washes, add value on top of that. 2. Using ink washes, fill in and build up all of your value first, and then add the black contour line detail on top of all of that.
Homework Assignment: Line As Movement & Abstraction.
ART 103 Line As Movement & Abstraction winter2014 (Download PDF)
ART 103 Line As Movement & Abstraction Examples (Download PDF)
ART 103 Drawing and Composition 1 – 23903
Week Six – 2/10/14
- Critique of Composition Homework.
- Continue working with Contour Line.
- Introduction to Thumbnails.
- Introduction to Still-Life Drawing.
- Introduction to Sighting & Measuring.
Thumbnail Drawing Examples (Download PDF)
In-Class: Introduction to Still-Life Drawing. Draw 3 thumbnails in your sketchbook, each from a different position around the still-life. Thumbnails are like visual note-taking to figure out your composition before you begin your final drawing. Use as much or as little detail as you personally need to complete your final drawing, and whatever notes are needed, as well. Choose one of the 3 thumbnails to base the large 18″ x 24″ final drawing from, and use only contour line and line sensitivity– no value (shading).
Homework Assignment: Continue and finish up the Contour Line Still-Life that you began in class.
